![]()
Overview
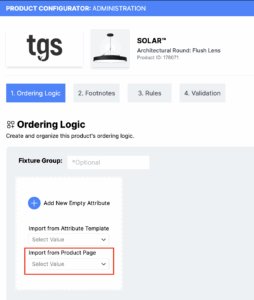
This guide will walk you through the process of creating and managing product ordering logic using attributes in The Lighting Exchange product configurator. Attributes define how codes and values are structured and displayed when configuring a product. You can populate attribute data in three ways:
- Input the data from scratch.
- Import data from an Attribute Template *recommended. (See Attribute Template Article)
- Import data from an existing product in The Lighting Exchange.
1. Creating a New Empty Attribute and Inputting Data from Scratch
Steps:
1. Add an Attribute Name:
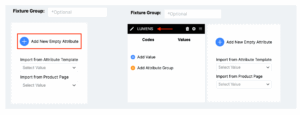
Enter a name for the attribute that clearly identifies its purpose.
2. Define the Attribute Type:
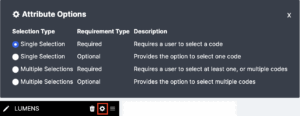
Select the attribute type to determine how it interacts with codes during product configuration. Attribute types include Single Selection or Multi-Selection, Required or Option.
3. Add and Organize Product Codes and Values:
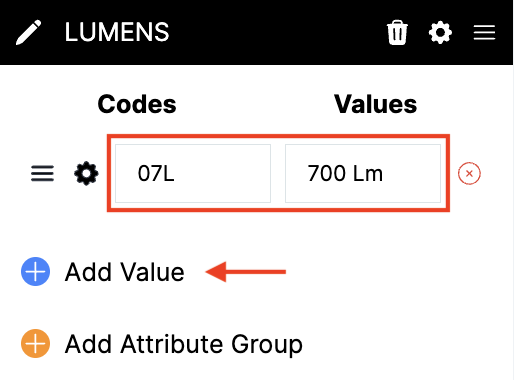
Manually input each code and its corresponding value. Values are optional, but Codes are required.
Example: Code: “Multi-Volt” | Value: “120-277V”.
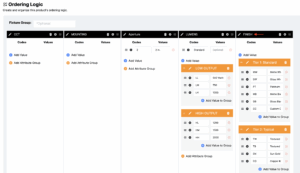
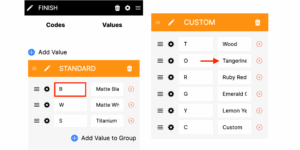
4. Utilize the Drag-and-Drop Feature for Easy Organization:
Rearrange codes and values by dragging and dropping them into the desired order using the hamburger menu next to each code and value line.
5. Organize Codes into Attribute Groups:
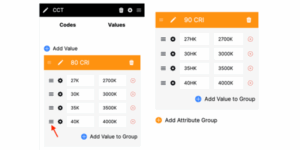
If further nomenclature organization is needed within an attribute, you can create attribute groups to categorize codes. Codes can be dragged from one group and dropped into another.
6. Add Descriptions to Codes:
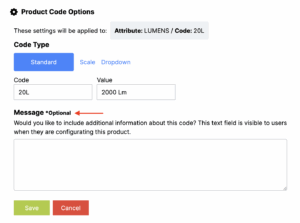
Provide additional details about each code and value to ensure users understand its purpose. Example Description: “For residential use only”.
2. Creating an Attribute and Importing Data from an Attribute Template (Recommended)
Using an Attribute Template simplifies the process and ensures consistency.
Steps:
1. Select an Attribute Template:

Browse the list of pre-configured templates and select one that matches your needs.
2. Add the Attribute Name:
Update the name if necessary to suit the product.
3. Define the Attribute Type:
Select the attribute type to determine how it interacts with codes during product configuration. Attribute types include Single Selection or Multi-Selection, Required or Option.
4. Review and Organize Codes and Values:
Edit the pre-loaded codes and values to ensure they align with the product’s requirements.
5. Use Drag-and-Drop to Rearrange Codes:
Adjust the order as necessary using the drag-and-drop feature.
6. Organize Codes into Attribute Groups:
Templates may include pre-defined groups; modify or add new groups as needed.
7. Add or Edit Descriptions for Codes:
Review or add descriptions to ensure users understand each code and value.
3. Creating an Attribute and Importing Data from an Existing Product
Leverage attributes from another product to save time.
Steps:
1. Locate the Existing Product:
Search for the product whose attributes you want to reuse.
2. Search and Select the Attribute to Import:
Choose a specific attribute to bring into the new product configuration.
3. Define the Attribute Type:
Select the attribute type to determine how it interacts with codes during product configuration. Attribute types include Single Selection or Multi-Selection, Required or Option.
4. Review and Organize Imported Codes and Values:
Ensure the imported codes and values align with the product’s requirements.
5. Reorganize Codes Using Drag-and-Drop:
Easily reorder codes to reflect the product’s priorities.
6. Organize Codes into Attribute Groups:
If further nomenclature organization is needed within an attribute, you can create attribute groups to categorize codes. Codes can be dragged from one group and dropped into another.
7. Add Descriptions for Codes:
Add an optional description to ensure users understand each code and value.
Workflow Tip
Attributes can be reorganized within the product ordering logic using the drag-and-drop feature. This allows you to quickly adapt and refine the product configuration for a seamless user experience.