![]()
File storage works just like DropBox but with the added benefit of being pre-organized for you and your agents.
File storage can be accessed by clicking on Storage in your sidebar navigation. This will open the main file storage page where you can search for and view all files that have been uploaded. From this screen you can also toggle the privacy settings for each document and share, download or delete a file.

There are two main folders in which you can upload files to, “Product Assets” and “Company Resources”.
In the “Product Assets” folder, you’ll find pre-labeled subfolders for housing your company’s Specsheets, Photometry, Brochures, Install Guides, BIM & CAD Files and Sell Sheets.

In the “Company Resources” folder, you’ll find subfolders for Price Guides, Terms & Conditions, Warranty, Shipping Terms, Brand Assets and Marketing Materials.

How to Upload a File
To upload a file, select the subfolder category for the file then select the “Upload File” button.

Simply drag and drop your file, or you can upload it from a folder on your computer. Then select the privacy setting. Public files are able to be viewed and downloaded by users on your internal team and your agents. Private files are only accessible to members of your internal team.
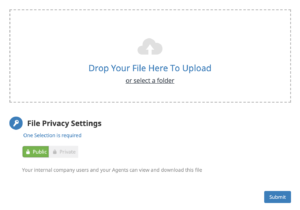
Once you have selected your privacy setting, press the “Submit” button to complete your file upload. Files that have been marked as Public will be immediately available to your agents within the portal.
Looking to tag assets to multiple products at once? View our article on Assigning an Asset to Multiple Products.